Wednesday 31 August 2011

It was good... In theory.

It came to me in a blur, just like most of my cooking ideas. Prawns + cous cous = yum. I have a recent love affair with cous cous, in case you haven't noticed. In particular, cous cous flavored with lemon and mint. It's really just that good. So, why not add roasted prawns and make it a whole meal? Sounded like a great idea to me!


So, I ran to the store and grabbed all the ingredients. Cous cous, lemons, some dried mint, and prawn meat. Yes, that is what that stuff in the gold foil package is. Yes, I am a lazy chef, and didn't feel like beheading all those poor little guys, then adding insult to injury and ripping off their little legs too. You would choose the easy option here too, don't lie.


So I went about seasoning the prawns with some salt and pepper while the oven heated up.


Then going with the lemon theme of the evening, I squeezed some fresh lemon juice of the little guys.


Mmmm... prawn sushi. Actually, ew. No, girl! Bad idea.


Toss em on a pan, and shove them into the oven.


Cous cous goes in the hot water. Yes, cous cous is really just that easy. I think it sits for like 5 minutes or something. Done and dusted.


During my 5 minutes of downtime, I zested some lemons. Cause it was fun, thats why! And, lemon zest is like little bits of sunshine.


Prawns were ready, and, you know, this is about where I should have realized things weren't going to be that great. Usually, prawns roast up all pretty and junk. The lemon juice did weird things to them.


None the less, I soldiered on with dinner. Add the lemon juice, the zest and a heap of dried mint to the cous cous.


Then I added the prawns. 

Trust me here. Don't make this. It wasn't good. Something about the flavors was just... wrong. JP gamely ate it up, but me, I didn't finish. Talk about disappointing. Peanut M&M's were all that cheered me up after that. Well, M&M's and about half a bottle of some white wine. That made it better. It also made me forget that I was still hungry...

xoxo
Craig

Wednesday 24 August 2011

Easy as pie. Only, it's not really pie.

So, you may, or perhaps may not depending on your level of attention, have noticed that I like versatile food. Things that are easy top that list. Easy and versatile. Almost sounds dirty. So, to take it in a totally different direction before your mind gets too far into that gutter, let me explain. No, too much to explain. Let me sum up. (Name that movie!) 

Quiche.

Ahh, now you get it! It's like a miracle food. It's at home in a bistro for lunch, or at a fancy French restaurant for dinner. You can also make it for breakfast. It's a true wunderfood. And I grew up loving it. So, I learned to make it. Ummm... can I tell you how freakin easy this is?? If I had only known, I would have been making it ages ago.

So, the basics for quiche is simple: eggs, cream, and cheese. Mix it up, put it in a pie crust, and bake it for 45 minutes.  Simple as that. The fun part about quiche? Yeah, just add whatever you want to it. Mushrooms? Sure throw those in. Bacon? Yeup. Spinach? Sure thing. Now, you can just throw the extra ingredients into the mix and bake it, but this is me we are talking about. I like to go lowbrow fancy.  


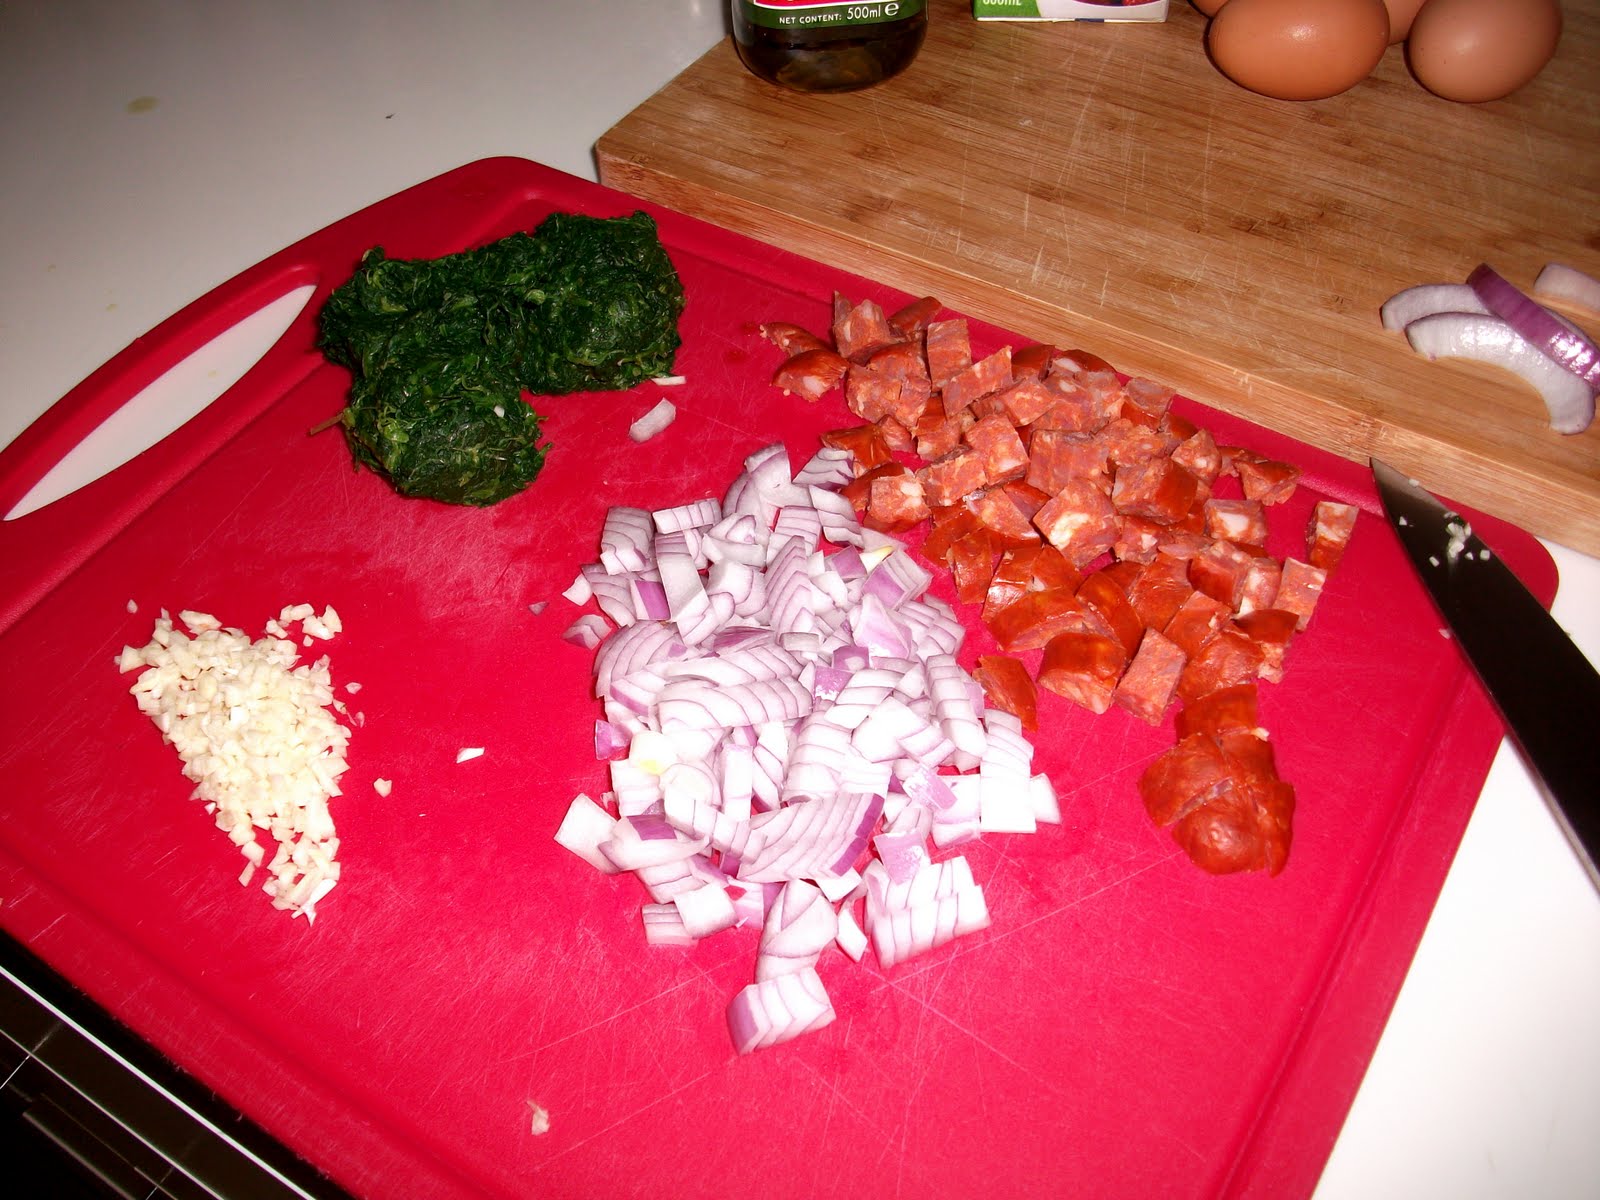
So, for this version, I decided that I wanted the flavors of chorizo and spinach. After deciding that those flavors weren't quite enough, I add the classic red onion, garlic, and black olives.


In case you were marveling at how amazing simple this is, there are a few tricks to make it a bit better. You want to make sure to cut everything up into about the same size pieces. And by same size, I really just mean small. Tiny, perhaps. Oh. And use frozen spinach. It works great here.


Be sure to drain the spinach though. That means you really need to squeeze the heck out of it after it defrosts. Just look at all that liquid frozen spinach holds. You don't want that in your quiche. Trust me on that one, yall.


So, my little extra trick for an amazing quiche? Sauté the extra ingredients first. In this case, I sautéed the chorizo with the onions and garlic. Next trick? Let it cool before you add it to the egg mixture, otherwise you will just end up with a scrambled egg mess thing. No one wants that. I mean it. Who would eat that? Not me, that's for sure.


So, while the hot ingredients are cooling, grab your eggs and cream. Mix em up like you would with scrambled eggs. Add some salt and pepper, too.


Next, start adding the cool ingredients. Mix after each addition, just to make sure it gets evenly distributed. So in goes the very squeeze-dried spinach.


Then a nice amount of black olives.


Of course, cheese. Now, with the cheese, use whatever you like. Here I had some mozzarella. Use cheddar, pepper-jack, swiss, gruyere, gouda... it's totally whatever you want. That's the amazing thing about quiche. Super versatile.


Now that your sautéed ingredients are cool, toss them on in there too. Hopefully, at this point, you have preheated your oven too. If not, turn that on real quick.


So, now to marry the insides to the outsides. I use frozen pic crusts. I mean, you could make your own, if you are that type of person. I am not. Plus, I don't have a pie dish to put it in. And, I'm a lazy chef. No shame in taking some help from the store. No. Shame. I mean it! STOP LAUGHING!


If you feel like getting a bit fancy, like I did, you can decorate the top while you wait for your oven to heat up. You know, in case you are the type of person to forget to do that, or something. Which I'm not. Whatever, stop judging me. It could happen to anyone.


After about 45 minutes of patiently waiting, and drooling over the smell emanating from your now warm oven, out pops this amazing looking creation.


Serve it up with something green, or just east it out of the pie dish. It's fine. I swear, I won't be judging you.  Also, make sure to save some, you know, to take to work. To make all your coworkers ask where you went to dinner. Then watch with glee as they glare at you when you tell them you made it yourself. Hopefully, while you have a mouth full of deliciousness.

Enjoy, my poppets.

xoxo Craig

Tuesday 16 August 2011

Sometimes, a jar o' sauce just ain't gonna cut it

Some nights, all you want is a giant steaming plate of pasta. It just sings to your soul. You know what I mean. Now, most of the time when this happens, I just reach for a jar of my favorite sauce from the pantry and call it a day. But, sometimes, that just ain't gonna cut the mustard. So, I've come up with a very simple, yet really delicious, homemade version of a meat sauce. 


There aren't many ingredients here, so it is important to use really good ones. I mean, really splurge on the canned tomatoes; just go for the $2 ones. It's worth it. Probably. At least go for ground sirloin, alright? Oh, and fresh basil. That ingredient actually is really important.


Of course, the base to any good sauce is garlic and onions. Lots of garlic. And onion. Yum. Oh, and on a side note: this may have been the most pungent onion I have encountered in my life. Ever. Not even kidding, here. I am not usually one to tear up while cutting an onions, but holy cow... tears were streaming down my face with this one. No one was more shocked than I was about this development. I hope it's not a recurring theme.


Want to know the trick to really tasty onions and garlic? Well, there are two tricks, to tell you the truth. So, the first trick, add a pad of butter to the olive oil. It helps, really it does. So much flavor, and the olive oil keeps it from browning. Very good friends, these two ingredients.


So, the second trick, you ask? Toss those alligator tear producing onions in first, and let them soften up for just a few minutes. Then, and only then, throw in the garlic. Trust me on this one. It keeps the garlic from burning. And, when you burn garlic, you have to start all over from the beginning. And that means more tears from those dang onions.


Now, you could make this a totally vegetarian sauce, by simply omitting the meat here. I would recommend adding some mushrooms if you are gonna do that... some nice meaty portobello would do the trick, I think. But, JP and I like our meat, so in with the ground sirloin. Use a wooden spoon to break it up. Oh, and don't drain it. It's called flavor. Embrace the concept. You will thank me. Also, use wooden spoons whenever you can. They are just better. No proof, just trust me. 


Tomato sauce wouldn't work with out the tomatoes. I used a combination of crushed and diced. So, in with a can of diced tomatoes.


Then, in with the second can.


Add a bay leaf. Cause thats what you do for good tomato sauce. Oh, and some worcestershire sauce, cause there's a whole lotta flavor in that little bottle.


Usually when you simmer the heck out of a sauce, I am all about the dried herbs. I mean, what a waste to simmer fresh herbs to death. But for this, the punch of fresh basil to very, very worth it.


Just add it at the last moments of cooking, and it will stay bright green, and add an awesome burst of fresh flavor to the sauce. Oh, and it looks really pretty, too!


Serve it all up over a massive plate of twirly pasta, with a generous sprinkle of freshly grated Ramano cheese. Cause it's different, thats why.


Add any remaining fresh basil to the top, and dig in. You'll thank me for this, I swear you will.

xoxo Craig

Keep reading for the recipe

Wednesday 10 August 2011

I'm not even pretending to be healthy here...

Hello, my darling little lovelies. This post will be somewhat of a different format this evening. You see, I stuffed up. Nothing terrible, I promise! You see, I accidentally invented last night, and I didn't have my camera handy to take photos for you! I am so sorry. Truly, because in this case, you would have jumped through the screen to get at what I am about to tell you about.

JP and I have a very good friend here named M. You see, M is from French-speaking Canada, and works for the consulate here in Sydney. Well, he did until today. You see, he got transfered to Colombia recently (Can you say hello vacation?! Cause I sure can...) and as a farewell, I wanted to cook him dinner. He mentioned to me once that he had never had real at-home fried anything, to which I naturally reacted with abhorrence. Naturally. So, my grand plan: make M a fried feast to die for. I pulled out all the stops; Deep Fried Chicken from this post, buttered potatoes, green beans, and to top it all off, Beer Battered Onion Rings.

This is where I started to invent. You see, I had everything I needed except the chicken for this. I had onions, flour, garlic, beans, potatoes... everything. I even had some buttermilk for some strange reason. So on my way home from work, I swung through my most reliable grocer and grabbed some chicken to fry up. Off home I went, super excited about making this dinner. I just knew it was going to be epic. Well, I got home, started cutting up the onions, grabbed some flour and added an egg. I went to the fridge, and....

NO BEER!!!!!


I looked at the clock, and saw that it would be cutting it close, but I could just make it to the bottle shop before it closed. Then I remembered I had already put the oil on the stove. And trust me, the thought of leaving 3 liters of hot oil on my stove top while I ran to the store just didn't sit well with me. I needed to go to Plan B. The only problem was, I had never made Beer Battered Onion Rings before, so there really was no Plan B. I was just gonna look up the recipe online and go from there. Enter Inventive Craig, stage right.

I didn't really even think to hard about what I did. I just kind of threw everything together and hoped for the best. And, trust me, best is what I got. The Onion Rings were super crispy and light, and the batter I came up with was divine! M couldn't stop eating them. In fact, neither could JP or I.

Really it was a stroke of cooking genius. I already mentioned that I had started with the batter when I made the terrible discovery. I briefly contemplated using whiskey, but then thought better of it, as any spirits here tend to cost roughly the equivalent of a small house in Manhattan. I dug through my fridge and saw the buttermilk. And Tabasco. And it was like a little halo of light, with that 'idea music' you get in the movies. I poured about half the bottle of Tabasco and most of the buttermilk into the batter, added some salt and pepper, and mixed it up to a consistency of wall paper paste. A bit thinner, actually. I really was going on a hope and a prayer here. Well, really, just the one time I had seen Paula Deen make Onion Rings on tv, and vaguely remembered what the consistency looked like that I was going for.

Turns out, I am a cooking genius. Make these tonight. And for thanks, I will be accepting donations of the cash variety. Plane tickets to Colombia are expensive, you know...


xoxo Craig

Monday 8 August 2011

Everything is Happier Down Under

So, since JP and I have moved from North Carolina down to Sydney, we have been noticing little differences here and there. For one thing, everyone drives on the other side of the road. Strange. But you want to know the main thing that we notice? It's ridiculously hard to not be happy here. Seriously. Not a joke.


I mean, just look at that. Look how happy I am right there. That would be very happy, in case you were unsure. Just think about it though; how could you not be happy when a beach like that is just outside your doorstep? I challenge you to be miserable when you get to enjoy things like this. 

You know how else I know everything is happier here? The food. 

Yes, the food is happier here. 

No. No, really! No, stop that laughing! I'm totally serious guys! 

Want me to prove it? Cause I will!!

Don't push me!! 

FINE!!! 

See???

xoxo Craig

Tuesday 2 August 2011

A little bit spicy, a little bit sweet. A delightfully guilt-free sin.

Sometimes for dinner, I am in the mood for a taste of something tropical.  You know, Caribbean-esque, if you will. I admit, living in Australia, this isn't the easiest thing to come across. Also, a lot of the dishes just take too much dang time. And, really; who wants to deal with that after work? So with that in mind, may I please introduce you to my Mango and Avocado Salad.


Just take a look at those ingredients! So colorful! So tropical! So... just, healthy and easy!!


Really, the most difficult part of this whole salad is cutting up the mango. I love mangoes, but they have this annoying large pit in the center, and you have to be very careful when cutting around it. It can make the knife slip, then you might have finger in your salad, and while grateful for the extra protein, it might ruin the taste a little...


Just to put the size of this pit into perspective, here I am holding it. It is best to not try to get right down to it; just leave some of the mango flesh on it. You will thank me for this.


Also, it allows you enjoy a bit of the mango before you have your salad. I love mangos. I keep saying that. Also, I look a bit strange in this photo, but you try taking a self-portrait  of yourself eating a mango when there is juice running all over your hands...


So, anyways, back to the salad. You will want to cut off the peel of the mango. This is much easier with a smaller knife, but I was feeling adventurous this evening.


Once peeled, give it a nice rough chop and dump it in a bowl. And really, the key to a good rough chop? Just make sure all the main ingredients are about the same size. Simple as that. Remember: texture is good!


So, ignoring the fact that I just told you to do a large rough chop of the ingredients, dice up half a small red onion. You'll want a pretty fine dice on this; no one likes to bite into a huge chunk of raw red onion. Wowza!


Chunk up a fresh tomato or two. Just remember to remove the seeds; you will have enough juice from the other fruit in there.


It's starting to come together! Look at how pretty that is starting to look!


Next up is the avocado. Now, normally you will want it to be just starting to ripen. I mean, barely soft. But, if you are like me, you bought this avocado a few days ago, with the intention of making this salad, but then got sidetracked over the weekend with other dinner plans that involved yummy restaurants that you have been wanting to eat at. If that's the case, your avocado might be a little tiny bit over ripe. But, not to worry! Just cut those little brown parts out. No biggie!


Dice that up too! Now, you'll notice that I did this step last. It is because the less time that it is exposed to air, the less time it has to go brown before you get the lemon juice on it. Something about the acid of the lemon juice preventing the avocado from oxidizing... or something like that. Perhaps magic is to blame... hmm... yes, magic.


Squeeze the bejeezus out of lemon. This is the dressing, so use a whole fresh lemon here. I know, I am usually one to reach for the bottled stuff in the fridge too, but fresh makes a difference in this case.


Chop up some coriander (Cilantro, for those of you in the USA. This would be another one of those silly name changes I wrote about here.) and just a little bit of mint. Really, this is one of those cases where more fresh herbs does not equal better. Go light with these ones, they pack a punch of flavor in this dish.


Toss in the herbs, add a little salt and pepper, and mix.


Give it a good mix; the avocado will break down just a little, and the juices from the mango and lemon turn really nice and rich. Also, it blends all the flavors together. Very important stuff here.


Now for the spice. I alway serve this salad with a meat. And that meat needs to be spicy. Not over the top, ohmygodimdying; but definitely make sure it gives you a good kick in the mouth. I went with chicken here, but trust me, this works really well with pork, chicken, red meat, and white fish. Bake it, sear it, whatever. Its all good as long as it's spicy. And spicy is always better with a little sweet.

xoxo Craig